Application installation
This article explains how to deploy the application to the customer server.
Installation procedure
Once the server is prepared and Ubuntu has been installed, you may begin the installation process.
We recommend performing the installation prior to visiting the customer premises to avoid downtime.
To install the application, follow these steps:
Connect to the server via Terminal:
CODEssh vasadmin@x.x.x.x
Enter the password
vasadmin.Switch to root privileges:
BASHsudo -ithen enter the password again.
Install CURL:
BASHapt update && apt install curl -yDownload the Forxai installer:
BASHcurl -o termix "https://nexus.kmrepo.eu:8443/termix"Modify the file to make it executable:
BASHchmod +x termixLaunch the installer:
BASH./termix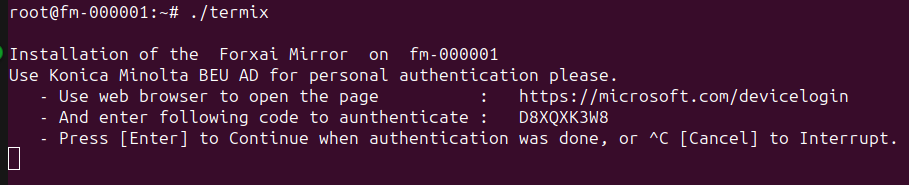
Follow the steps in the installer:
Double-click the code, then press Ctrl + Shift + C to copy it.
Ctrl-click the URL to open it in a browser.
Enter the copied code.
Log in using your standard Konica Minolta credentials (used to authenticate Windows).
Upon a successful authentication, return to the installer and press Enter.
 Repeat step 7 when you encounter a “Failed to obtain Azure AD token” error.
Wait for Teleport to be installed. This process should take about 2 minutes.
Select the version to install.
Select the latest version of the application unless instructed otherwise by the project delivery team.
You will be asked to start the installation of Forxai Video Vision.
Verify the hostname is correct, then type inYesand press Enter.The installation will begin.
This process should take approximately 20 minutes
You will receive an email confirming whether the installation was successful. If it fails, follow the instructions in the email.
Once the installation is finished, launch the Video Vision application by entering the IP address of the device running the application into the address bar of a web browser.
You have successfully finished the installation process of the Video Vision application.